Friday, June 4, 2010

Saturday morning at Mo's


Spent a few hours with Peter Mo this morning watching him ply his trade to three freshly shaped Dick van Straalen shapes. Amazing to watch the transformation as he applied the gloss coat. Pete is a perfectionist at his trade and it reallys shows through and results looked amazing. Was a privilege to be able to watch the work done on these boards.


Bookmark and Share


Tuesday, June 1, 2010

fins glassed


dropped into Mo's and checked out the fins he had glassed. Impressed with the grain.

Bookmark and Share


Thursday, May 27, 2010

Glassing update


Two layers of the glass has been laid with the fins due to go on by early next week. The grain of the timber is starting to show through and this is where the rewards of choosing the ply decks carefully start to pay dividends. Results speak for themselves....

Bookmark and Share


Thursday, May 20, 2010

Glassing "El Viento"

I spent a morning with Peter watching him begin to glass "el viento". The resin is epoxy as it is clearer than polyester resins and has a slower curing time therefore a deeper bond into the wood.


Music from this clip comes from a good mate of mine Ashley Perrow and his band The Lamplights. Check it out here

Bookmark and Share

Tuesday, May 4, 2010

off to the glasser

So we took the boards to the glasser today. Peter Mo, Modecks in Currumbin came highly recommended to us to complete the job. We went with an epoxy resin, with 6 ounce glass on the top and bottom. Peter talked us through the whole process and was great in helping us make the decisions that needed to be made.
Bookmark and Share

Friday, April 16, 2010

Surfrider Foundation Board Swap


Should be a fun day. Not going to be swapping these wooden babies though!! I'll take along something else, great concept.


Bookmark and Share

Saturday, March 27, 2010

Fins Foiled

Have gone with Rich Pavel Speed Dialer fins for my board and have just finished foiling them from bamboo. I was fortunate enough to meet and have a quick chat with Rich at The Alley Fish Fry a few weeks back, stoked to meet the guy behind the design. The fins in the photo below are not yet attached. They will be attached during the glassing stage in a couple of weeks. Pretty soon Scott and I will actually be surfing these things!!


Also here is a look at the logo that I will put onto the board under the glass job.


Bookmark and Share

Thursday, March 25, 2010

fins are ready


I finished the third and fourth fin in bamboo and happy with the two tone effect. The two larger fins are red cedar. Hopefully they will all be strong enough to lay a carve into the face of the wave without snapping. I hope to get them glassed with 6 or 8 Ounce glass for extra strength. This will add thickness to them, but i dont want to sacrifice the strength. Almost ready to be sent off for glassing. Running my eyes over every edge of the board now to finish any imperfections.


Bookmark and Share


Wednesday, March 24, 2010

rail shaping


updated shots of the rails starting to take shape


Bookmark and Share


Friday, March 19, 2010

almost done!

Started sanding the rails this morning and it the fish is starting to reveal itself. Took the protective plastic off so i could admire it in all it its glory. Still got some finer sanding to complete the rails and then finish off the fins.

Bookmark and Share


Saturday, March 13, 2010

the tail taking shape


Made a start on the tail and its slowly starting to appear. The Journey in-wood is near its end. But got a lot of dust still to come...stay tuned


Bookmark and Share


Friday, March 12, 2010

Rails are on!

So i finally got around to glueing the rails on. Have fallen a bit behind Duncan so needed to make a solid start on it over the weekend. So glued 4 strips to the tail and went with 3 strips for the rails. This will gve me aorund 21mm rails to work with. The router came in handy to trim off the excess pieces of cork (thanks Ben). Wont be ready for the Fish Fry on Sunday at Currumbin, but will head down to check out the various shapes to get some ideas for my next board.


Bookmark and Share


Friday, March 5, 2010

portable shaping cradle

We came up with the idea of a portabe shaping cradle which could be clamped to any work bench. Duncs and i knocked it up with a bit of scrap and carpet underlay for padding. It will help in the shaping stage which i havent reached. Have the tail pieces glued on so far. Using 100% cork for the tail and rails


Bookmark and Share


Saturday, February 27, 2010

Finishing off and deciding on fins...

Still touching up the rails by hand, but also now need to make a decision between using 4 AB 1 templates for the fins or attempt to make a set of Rich Pavel Speed Dialer fins.. Any suggestions...??


Bookmark and Share

Friday, February 19, 2010

Rail Shaping 101 - The board gets unwrapped

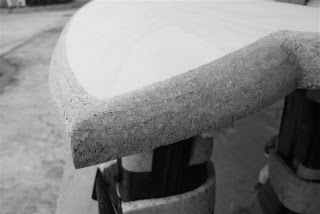
So the true shaping is well and truly underway now. Everyone will have their own technique for this stage. I sstarted using a belt sanded then went back to an orbital, then hand sanding with a block. The rails have come up pretty well so far. With the bending ply any errors in the curve are very noticeable but it also is quite an accurate guide for my curves because of the lines through it as you sand back. Below are a couple of shots of the board now that the protection of the deck has been taken off. Not far to go now.


You may notice on the second shot some glue up near the nose, this is just filling a small gap between the cork and the ply on the rail. It will then be sanded off when it dries. I didn't unwrap the board until I was ready to sand back the last millimeter or so onto the deck. The tape has protected the deck well, however there are a couple of marks that I will have to try and sand out (hopefully only I notice them)

Below are some plan shots of what the rails are meant to look like. I think I'm close but still want to do a bit more handsanding to get them perfect.




Bookmark and Share

Saturday, February 13, 2010

And so the shaping begins...

Now that the rails are on it is now time to shape the curve into them. This is not as easy as it may first appear and requires extra care as everything will be visible in the final product. Here are a couple of shots so far. I am shaping the top side first and then curving the underneath up to it. The shape of the rail is a rough take on one of my other boards (5'10" DVS fish). Care is of the essence now. More photos to come when it all starts to take shape. Almost complete.... Yeeeew!!!


Bookmark and Share